The SNNS interface of CytoSpec
The following tutorial gives a short description of how to use the CytoSpec-SNNS interface. Please note that this tutorial
cannot give a complete overview of the full functionality of the SNNS. Please refer also to the respective SNNS or JavaNNS
manuals.
Requirements:
- CytoSpec, licensed version (ANN functions are not available in the demo version)
- SNNS 4.1 or 4.2. (LINUX) or JavaNNS (Windows)
- duconv, dos2unix, or unix2dos - command line tools for DOS ↔ UNIX conversions of the pattern and result ASCII
files (required only if the SNNS under LINUX is used).
Useful Links:
- Description of the
 ANN imaging function in CytoSpec ANN imaging function in CytoSpec
- the Stuttgart Neural Network Simulator
- SNNS
user manual
Part A - Define training and internal validation data sets
Training and internal validation data sets consist of individual spectra with known class assignments. Both data sets can be
created from hyperspectral maps by extracting single point spectra in the following way:
- Load an imaging data file in CytoSpec
- Perform spectral preprocessing
- Create a hyperspectral map (chemical map or cluster map)
- Perform class definitions by applying the class definition tool of CytoSpec ('select spectra', see function
export)
- Export selected of spectra using the export function of CytoSpec. Details are given
here
It is recommended to create first the teaching data set and then the internal validation data subset. When doing so, it is
furthermore recommended to apply exactly the same settings for the export function. Otherwise, the ANN classification will
produce inconsistent results. Use the 'use log file' option (function export) which assures that identical spectral
features and the same spectral windows are applied to both spectral subsets.
Part B - Create an ANN with the SNNS
Transfer the teaching and validation data files (*.pat) to the LINUX machine. If the files are copied via a network, floppy or
USB devices, the DOS ↔ UNIX conversion of plain ASCII text files may be required. In these instances, the usage of command
line tools such as dos2unix or unix2dos is recommended.
- Start the SNNS and load both pattern files by selecting FILE from the snns-manager and PAT and LOAD from the SNNS file
browser.
- Chose BIGNET (feedforward, snns-manager) from the snns-manager
- Define the network topology in the BigNet (Feed Forward) window. Three layer multilayer perceptron ANNs consisting of a
layer of input, hidden and output neurons can be created using this tool. Use the buttons ENTER, INSERT, OVERWRITE, DELETE,
PLANE TO EDIT and TYPE in the Edit Plane -line of the BigNet (Feed Forward) window to define the ANN topology. Note that
the number of input neurons must equal the number of input units (=number of spectral features) in the pattern files.
Furthermore, the number of output neurons should correspond to the number of predefined spectral classes (No. of output
units). Open one of the pattern files if you are uncertain about these numbers.
- When finished select either FULL CONNECTION or SHORTCUT CONNECTION (line Edit Link) and press the button CREATE NET.
- The network architecture and structure can now be displayed in the SNNS. To do so, select DISPLAY from the
snns-manager
- Open the SNNS control window by pressing CONTROL from the window snns-manager. Select the training pattern file by
pressing the button USE in the line PATTERN of the snns-control window. The internal validation subset can be activated
in the same way by pressing USE in the line VALID
- Insert the number of training cycles (e.g. 100) and select a learning, update and initialization function.
- When finished, initialize the weights by pressing the INIT button (line STEPS) and start ANN learning with the ALL
button (line CYCLES).
- The dependencies of sum squared error from the training cycle number of teaching and internal validation set can be
graphically displayed in the graph window. Open this window by pressing the GRAPH button of the snns-manager window.
IMPORTANT: A successful learning process is typically characterized by a smooth SSE curve which ideally converges to
zero for the teaching subset. The error curve of the internal validation data set typically exhibits a local minimum
at which ANN teaching should be stopped. Avoid artificial oscillations in these curves by adapting the network architecture,
mostly by reducing the complexity of the network, or by including more (or better suited) training examples.
- When ANN teaching is completed, the network can be stored. Use the SNNS file browser for this.
Part C - Create and classify an external validation test set (single spectra, or complete imaging data sets)
External validation subsets can be created with CytoSpec in two ways:
In the first instance, pixel spectra are extracted
and pattern files are produced in the same way as described for the internal validation subset. These steps are decribed in
the first section of this manual (see points 1-5).
Secondly, using CytoSpec it is also possible to classify all spectra
of a hyperspectral map and to utilize the network classification for image segmentation. In this instance, the pattern files
of the validation subset contain not only the spectral, but also the spatial information, which is required for subsequent
ANN image reassembling. The external validation pattern file is generated, transferred to the SNNS platform, classified by
the SNNS and the result file, with the classification results is back-transferred to CytoSpec. The result files can be analyzed
by CytoSpec and utilized for false-color ANN imaging. In the following section these steps are described in more details.
- Load an imaging data file in CytoSpec
- Perform spectral preprocessing. IMPORTANT: apply exactly the same preprocessing to the validation data.
- Using the export function of CytoSpec, the ANN imaging file with spectral patterns can be created. Select
'export' from the 'File' menu bar. Check the checkbox 'use log file' of the following dialog box and
load the file with the teaching parameters of a previous (i.e. the teaching) CytoSpec session. The the checkbox
'export all spectra' becomes activated. Check this checkbox and store the pattern file by pressing 'export'.
- Transfer the stored file to the SNNS, or JavaNNS platform. DOS ↔ UNIX conversion of the ASCII file may be required.
- Start the SNNS and load the pattern file by selecting FILE from the snns-manager and PAT and LOAD from the
SNNS file browser.
- Load the network file (should be stored before) and open the SNNS control window by pressing the button CONTROL of
the snns-manager. Press then the button TEST (line cycles).
- The classification results of the external validation subset can be subsequently stored. This can be done in the
file browser dialog box of the SNNS. Press button RES and select the option 'include output patterns' and
unselect the option 'include input patterns' when saving '*.res' files (see screenshot of the 'result file
format' in the help files of the ANN imaging function).
Hit 'SAVE' for storing.
- Copy the *.res file to the CytoSpec PC. DOS ↔ UNIX conversion of the ASCII file may be required.
Part D - ANN imaging
- This function is available via the option 'ANN imaging' of CytoSpec's menu bar 'Multivariate Imaging'
(see ANN imaging for details).
|
|
Links:
|

 snns-manager, file
browser and snns-control windows
snns-manager, file
browser and snns-control windows 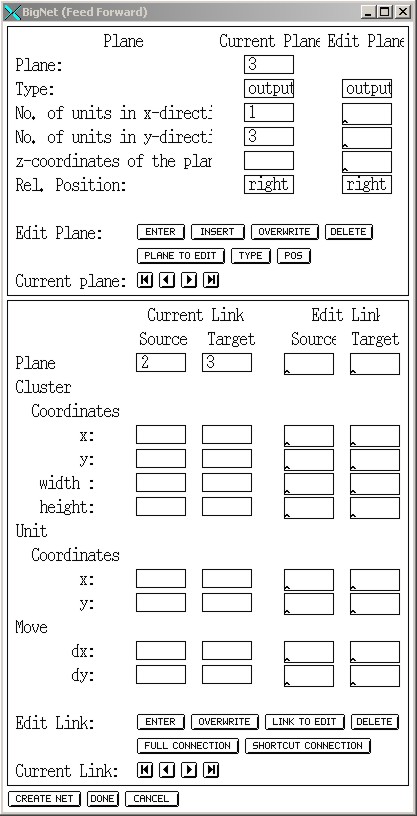 BigNet (Feed Forward)
window
BigNet (Feed Forward)
window 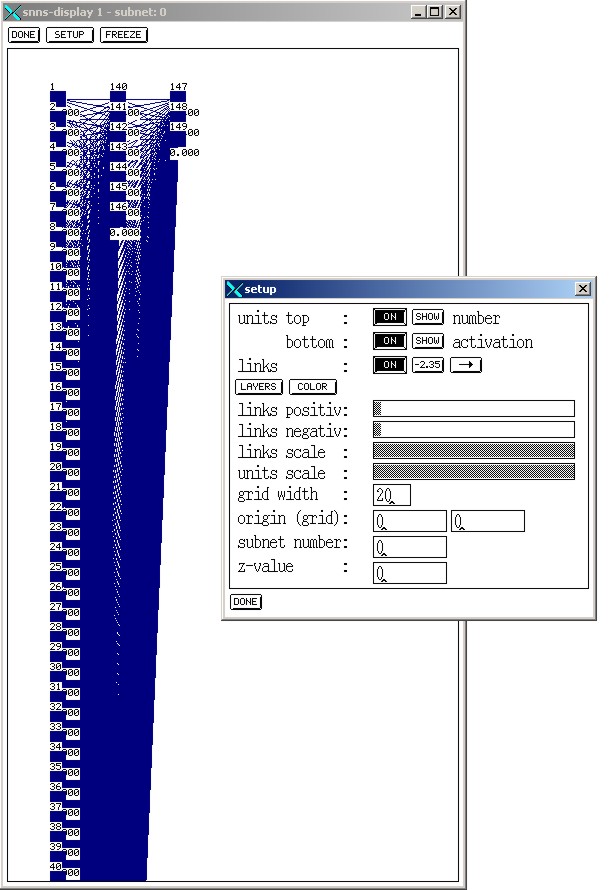 ANN topology